Recipes

Tennessee Mountain Stack Cake

2 Mins read
Scroll to recipe

Introduction

Discover the unique charm of Tennessee Mountain Stack Cake, a delightful dessert that embodies both tradition and innovation in baking. This cake isn’t just a treat for your taste buds; it’s a journey through history with every layer.

Tips for this Recipe

When making Tennessee Mountain Stack Cake, precision and preparation are key. Ensure all equipment is clean before use, measure ingredients carefully, especially the flour, and consider pre-cooking your apples to avoid a soggy bottom layer.

Why you will love this recipe

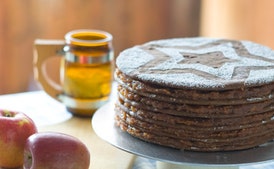
This Tennessee Mountain Stack Cake stands out for its meticulous assembly that results in an impressive, layered presentation. Each bite is a testament to the rich flavors of molasses and cinnamon intertwined with the rustic sweetness of dried apples.

Ingredients

  • 21 ounces all-purpose flour (4 1/4 cups)
  • 1 teaspoon salt
  • 1/2 teaspoon baking soda
  • 1 teaspoon baking powder
  • 1/4 teaspoon cinnamon
  • 6 ounces unsalted butter (1 1/2 sticks)
  • 10 ounces superfine granulated sugar (1 1/4 cups)
  • 3/4 cup molasses
  • 2 eggs
  • 1/2 cup buttermilk
  • 8 to 12 cups dried apples
  • 2 pounds superfine granulated sugar (4 cups)
  • 2 teaspoons cinnamon
  • 2 teaspoons nutmeg
  • 2 tablespoons molasses
  • 3 cups water

Adviced equipments

  • Stacking Bars: Essential for assembling multiple layers of your cake, ensuring stability and even height across each layer.
  • Cake Dowels or Straws: Used to reinforce stacked layers, preventing sagging by distributing weight evenly.
  • Offset Spreaders (Frosting Spatulas): Vital for spreading frostings and fillings smoothly between layers without damaging the cake surface.
  • Piping Bags with Tips: For decorating, used to pipe intricate designs or borders on the cake’s surface, adding an elegant touch.
  • Cake Levelers (Spatula Cake Leveler): Ensures each layer is even and flat before assembly for a well-balanced stacked cake.
  • Diameter Ring Pans: 8-inch or 9-inch examples, useful for creating uniform layers that fit snugly together in the stacking process.
  • Cake Tins with Removable Bases (such as springform pans): Ideal for easy layer extraction and cleanup, particularly beneficial when working with denser cakes or fillings.
  • Air-tight Cake Carrier: For transporting the finished cake safely without compromising structural integrity.
  • Silicone Baking Mats (for making homemade stack bars): Can be used in baking smaller, reusable pieces that serve as building blocks for your layers.
  • Cake Slicers or Serrated Knives: Necessary for cutting even layers of cake and removing the top layer to create space for additional frosting between stacked sections.
  • Kitchen Scale (for precise measurements): Ensuring all components are measured accurately, contributing to a consistent and successful final product.

History of the recipe

The Tennessee Mountain Stack Cake is a nod to Appalachian cooking traditions, blending local flavors with baking craftsmanship. Rooted in community gatherings and harvest festivals, this cake has evolved over generations, embodying the resilience and resourcefulness of its people.

fun facts about this recipe

This stacked marvel isn’t just a dessert; it’s an experience. The dried apples play a starring role, offering a tart counterpoint to the sweetness of molasses and spices. Moreover, using local produce like dried apples ties this recipe back to its Appalachian roots.

Share
Tennessee Mountain Stack Cake

Tennessee Mountain Stack Cake

amanda

Equipment

  • - Stacking Bars

  • - Cake Dowels or Straws

  • - Offset Spreaders (Frosting Spatulas)

  • - Piping Bags with Tips

  • - Cake Levelers (Spatula Cake Leveler)

  • - Diameter Ring Pans

  • - Cake Tins with Removable Bases (such as springform pans)

  • - Air-tight Cake Carrier

  • - Silicone Baking Mats (for making homemade stack bars)

  • - Cake Slicers or Serrated Knives

  • - Kitchen Scale (for precise measurements)

Ingredients

  • 21 ounces (4 1/4 cups) all-purpose flour

  • 1 teaspoon salt

  • 1/2 teaspoon baking soda

  • 1 teaspoon baking powder

  • 1/4 teaspoon cinnamon

  • 6 ounces (1 1/2 sticks) unsalted butter

  • 10 ounces (1 1/4 cups) superfine granulated sugar

  • 3/4 cup molasses

  • 2 eggs

  • 1/2 cup buttermilk

  • 8 to 12 cups dried apples

  • 2 pounds (4 cups) superfine granulated sugar

  • 2 teaspoons cinnamon

  • 2 teaspoons nutmeg

  • 2 tablespoons molasses

  • 3 cups water

Instructions

1

Instruction 1

Preheat the oven to 350°F and place the rack in the middle position.
2

Instruction 2

Combine the dry ingredients in a bowl and whisk to combine. Set aside.
3

Instruction 3

Combine the butter and sugar in the bowl of a standing mixer fitted with the paddle attachment and mix on medium speed until wet and grainy.
4

Instruction 4

Add the molasses. Scrape the sides of the bowl with a flexible spatula to get all of the molasses into the mixture.
5

Instruction 5

Add the eggs one at a time. Scrape all the way to the bottom of the bowl and mix on low speed.
6

Instruction 6

Alternately add the buttermilk and the dry mixture about a quarter at a time. Stop the mixer to scrape the bowl and turn it on again on low speed for about 10 seconds. The mixture should be stiff like a soft cookie dough.
7

Instruction 7

Shape the dough into a ball and wrap it in plastic wrap. Refrigerate for 30 minutes.
8

Instruction 8

Divide the dough into 6 or 8 equal portions and place each one on a round piece of parchment paper a little larger than a 9-inch cake pan. Roll out the dough to the size of the parchment. Place the cake pan over the disk and trim away the excess around the edge.
9

Instruction 9

Leaving the parchment paper underneath, lift the disks onto baking sheets and bake them for approximately 10 minutes, or until the top surface appears dry and a wooden skewer inserted in the center comes out clean.
10

Instruction 10

Slide the disks off the baking sheet onto a flat surface to cool.
11

Instruction 11

To make the filling, combine all the ingredients in a large, heavy-bottom saucepan and bring to a light simmer. Immediately transfer to the work bowl of a food processor fitted with the steel blade and pulse into a thick paste.
12

Instruction 12

To assemble the cake, spread about 1 cup of the filling onto each layer, taking care to center each disk on top of the one beneath it. Repeat until all the layers are used. Do not put apple filling on top of the cake.
13

Instruction 13

Wrap the cake well and refrigerate it for up to 24 hours. This gives the apple filling time to work itself into the cake. Dust with confectioners' sugar and serve chilled.
You may also like
Recipes

hot-buttered-rum

1 Mins read
Introduction Discover the cozy warmth and delightful flavors of a timeless classic. The Hot Buttered Rum recipe invites you to indulge in…
Recipes

Fish Vermicelli with Fresh Dill and Pineapple Sauce

1 Mins read
Introduction Dive into the delightful world of flavors with “Fish Vermicelli with Fresh Dill and Pineapple Sauce”, a unique culinary experience that…
Recipes

Endive and Chicory Salad with Grainy Mustard Vinaigrette

2 Mins read
Introduction This Endive and Chicory Salad with Grainy Mustard Vinaigrette is a delightful combination of the earthy, slightly bitter flavors of Belgian…

Leave a Reply

Your email address will not be published. Required fields are marked *