Recipes

Yellow Layer Cake with Chocolate-Sour Cream Frosting

2 Mins read
Scroll to recipe

Introduction

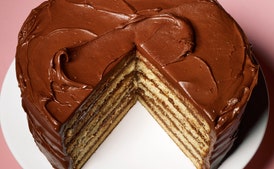
The Yellow Layer Cake with Chocolate-Sour Cream Frosting is a delightful dessert that combines the fluffy texture of a classic yellow cake with the rich, tangy notes of sour cream frosting and chocolate. This recipe not only promises to deliver an impressive visual appeal but also boasts layers of delectable flavors and textures that are perfect for celebrating occasions or just satisfying your sweet tooth.

Tips for this Recipe

Achieving the ultimate layered cake requires attention to detail, especially when it comes to ingredient measurements and baking times. Ensure all equipment is preheated and properly greased before beginning. For those with a passion for precision, consider using a digital scale to measure dry ingredients accurately and test doneness by inserting a long-handled cake tester into the center of each layer.

Why you will love this recipe

This Yellow Layer Cake is more than just a dessert; it’s an indulgent experience crafted for those who appreciate meticulous preparation and rich flavors that dance together harmoniously. The moist, tender cake paired with the luxurious chocolate-sour cream frosting creates an unparalleled combination of textures and tastes that promises to be a showstopper at any table.

Ingredients

– 4 cups cake flour
– 2 teaspoons baking powder
– 1 1/2 teaspoons baking soda
– 1 1/2 teaspoons kosher salt
– 1 1/2 cups buttermilk
– 1/2 cup vegetable oil
– 2 teaspoons vanilla extract
– 2 cups sugar
– 1 cup (2 sticks) unsalted butter, room temperature
– 1/2 cup light brown sugar
– 6 large egg yolks
– 3 large eggs
– 14 ounces semisweet or bittersweet chocolate, chopped
– 1/4 cup light corn syrup
– 2 cups sour cream
– 1 1/2 teaspoons kosher salt
– 1 1/2 teaspoons vanilla extract
– 2 3/4 cups powdered sugar
– 3/4 cup (1 1/2 sticks) unsalted butter, room temperature
– Three 9″-diameter cake pans with 2″ sides

Adviced Equipment

To create this exquisite layered masterpiece:
– Stand Mixer (with paddle attachment)
– Measuring Cups & Spoons Set
– Rubber Spatula
– Spring-Tip Pastry Bag & Nozzle Set
– Wire Cooling Rack
– Offset Spatula
– Long-Handled Cake Tester or Toothpick
– Digital Scale (optional)
– Cake Stand

History of the Recipe

The art of layered cakes has a rich history, evolving over centuries from simple tasting methods to elaborate desserts. This Yellow Layer Cake with Chocolate-Sour Cream Frosting is inspired by the traditional baking techniques that emerged in 19th century America as bakers sought ways to elevate common ingredients into celebratory treats. The incorporation of semisweet chocolate and sour cream reflects a modern twist on classic flavors, paying homage to their longstanding appeal while introducing new depths to the dessert experience.

Fun Facts about this Recipe

The Yellow Layer Cake with Chocolate-Sour Cream Frosting isn’t just a recipe—it represents an evolution of baking traditions and innovations in flavor pairings. One fun fact to consider is that chocolate was first used as a frosting for cakes by the French in the 19th century, marking the beginning of what we now recognize as modern frosting techniques. Additionally, sour cream has been celebrated in American baking since its introduction post-Civil War era due to its unique tanginess and ability to create a tender crumb in cakes. Combining these elements creates not only a visually stunning dessert but also an edible piece of history on your plate.

Share
Yellow Layer Cake with Chocolate-Sour Cream Frosting

Yellow Layer Cake with Chocolate-Sour Cream Frosting

amanda

Equipment

  • Stand Mixer (with paddle attachment) - Ideal for mixing batter efficiently and ensuring a smooth consistency.

  • Measuring Cups & Spoons Set - Essential for accurately measuring ingredients to maintain the recipe's integrity.

  • Rubber Spatula - Useful for folding ingredients gently, especially when incorporating sour cream into the batter.

  • Spring-Tip Pastry Bag & Nozzle Set - Perfect for decorating and piping frosting smoothly between cake layers.

  • Cake Baking Pan (either 9x13 inch or two 6-inch round pans) - The recipe calls for a layered effect, so either size could work based on personal preference.

  • Wire Cooling Rack - To cool the cake layers properly after baking and before assembly to ensure they don't collapse under their weight when frosted.

  • Offset Spatula - Useful for spreading and smoothing frosting on each layer of the cake evenly.

  • Long-Handled Cake Tester or Toothpick - For testing if the cakes are baked through, which is crucial to avoid undercooked or overcooked layers.

  • Digital Scale (optional) - While not strictly necessary, a digital scale can ensure precise ingredient measurements for optimal results.

  • Cake Stand - To display and serve the cake elegantly after decoration.

Ingredients

  • Nonstick vegetable oil spray

  • 4 cups cake flour

  • 2 teaspoons baking powder

  • 1 1/2 teaspoons baking soda

  • 1 1/2 teaspoons kosher salt

  • 1 1/2 cups buttermilk

  • 1/2 cup vegetable oil

  • 2 teaspoons vanilla extract

  • 2 cups sugar

  • 1 cup (2 sticks) unsalted butter, room temperature

  • 1/2 cup (packed) light brown sugar

  • 1 vanilla bean, split lengthwise

  • 6 large egg yolks

  • 3 large eggs

  • 14 ounces semisweet or bittersweet chocolate, chopped

  • 1/4 cup light corn syrup

  • 2 cups sour cream

  • 1 1/2 teaspoons kosher salt

  • 1 1/2 teaspoons vanilla extract

  • 2 3/4 cups powdered sugar

  • 3/4 cup (1 1/2 sticks) unsalted butter, room temperature

  • Three 9"-diameter cake pans with 2" sides

Instructions

1

Instruction 1

Arrange racks in upper and lower thirds of oven; preheat to 350°F. Coat cake pans with nonstick spray. Line bottom of pans with parchment-paper rounds; coat paper. Whisk flour, baking powder, baking soda, and salt in a large bowl until no lumps remain. Combine buttermilk, oil, and vanilla in a medium bowl.
2

Instruction 2

Combine sugar, butter, and brown sugar in another large bowl. Scrape in seeds from vanilla bean. Using an electric mixer, beat butter mixture until light and fluffy, 3-4 minutes. Add yolks and eggs one at a time, beating to blend between additions and occasionally scraping down sides and bottom of bowl.
3

Instruction 3

Continue to beat mixture, occasionally scraping down sides and bottom of bowl, until almost doubled in volume and very light, airy, and pale yellow, 5-6 minutes. It's very important that no lumps remain at this stage. (Occasional scraping of the bowl, especially the bottom, helps prevent lumps.)
4

Instruction 4

With mixer on low, add dry ingredients in 3 additions, alternating with buttermilk mixture in 2 additions, beginning and ending with dry ingredients.
5

Instruction 5

Divide batter evenly among prepared pans, about 3 1/2 cups per pan. Smooth tops.
6

Instruction 6

Bake, rotating cakes from left to right and top to bottom halfway through, until cakes are light golden brown, the centers spring back when gently pressed, and a tester inserted into the centers comes out with a few moist crumbs attached, 35-40 minutes.
7

Instruction 7

Transfer cakes to wire racks; let cool in pans for at least 30 minutes. Invert cakes onto racks, peel off parchment, and let cool completely.
8

Instruction 8

Using a long serrated knife, remove top dome and any bumps from each cake to create a flat surface. Slice each cake in half horizontally to make 6 layers total. DO AHEAD: Cakes can be baked 1 day ahead. Wrap tightly in plastic wrap and store at room temperature.
9

Instruction 9

Stir chocolate and corn syrup in a large metal bowl set over a large saucepan of simmering water until melted and smooth; remove from heat. Stir sour cream, salt, and vanilla in a medium metal bowl; set over same saucepan of simmering water. Stir until mixture is warm but not hot, about 2 minutes. Add sour cream mixture to chocolate mixture; stir until smooth and glossy. Set aside.
10

Instruction 10

Using an electric mixer, beat powdered sugar and butter in a medium bowl until light and fluffy, 2-3 minutes. Scrape down sides of bowl. Slowly beat in chocolate mixture. Continue beating until no lumps remain, about 2 minutes. Frosting should be smooth and shiny. Cover and chill until slightly firmed up, about 30 minutes.
11

Instruction 11

Place 1 cake layer on a cake stand or large plate. Spoon 1/3 cup frosting over; using an offset spatula or the back of a spoon, smooth frosting to edge of cake, creating an even layer. Place another cake layer on top. Repeat with frosting and remaining cake layers. Spread remaining frosting over top and sides of cake. DO AHEAD: Cake can be made 1 day ahead. Cover with a cake dome and store at room temperature.
You may also like
Recipes

hot-buttered-rum

1 Mins read
Introduction Discover the cozy warmth and delightful flavors of a timeless classic. The Hot Buttered Rum recipe invites you to indulge in…
Recipes

Fish Vermicelli with Fresh Dill and Pineapple Sauce

1 Mins read
Introduction Dive into the delightful world of flavors with “Fish Vermicelli with Fresh Dill and Pineapple Sauce”, a unique culinary experience that…
Recipes

Endive and Chicory Salad with Grainy Mustard Vinaigrette

2 Mins read
Introduction This Endive and Chicory Salad with Grainy Mustard Vinaigrette is a delightful combination of the earthy, slightly bitter flavors of Belgian…

Leave a Reply

Your email address will not be published. Required fields are marked *