Introduction
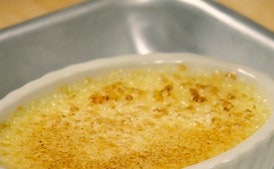
Crème Brûlée, known as the quintessential French dessert, offers a luxurious and rich taste that captivates dessert lovers worldwide. With its creamy custard base topped with an irresistibly crisp caramelized sugar layer, this classic treat promises an indulgent experience perfect for any occasion or casual dining night in.
Tips for this recipe
Ensuring your Crème Brûlée has that velvety smooth texture and a perfectly caramelized top is key to excellence. To achieve the best results, make sure eggs are at room temperature before use, and consider using heavy cream rather than whole milk for a richer flavor and thicker custard base.
Why you will love this recipe
The allure of Crème Brûlée lies in its simplicity masking the complexity beneath: an exquisite blend of sweet, creamy vanilla custard contrasted with a brittle sugary top. This dessert is not only easy to make but also leaves a lasting impression with each delicate bite, making it a favorite for both beginners and seasoned cooks alike who appreciate the elegance in its preparation and presentation.
Ingredients
2 1/2 cups heavy cream
3/4 cup sugar
1/2 vanilla bean, split lengthwise and seeds scraped
Pinch salt
5 large egg yolks, lightly beaten
6 tablespoons sanding sugar
Adviced equipments
Pouring pitcher – Essential for accurately measuring and transferring liquid ingredients like cream or milk into ramekins where the brulee mixture will be added.
Ramekins (6 oz) – Crucial for portioning out individual servings of crème brûlée, ensuring consistent size and shape across batches.
Heavy-duty hand mixer – Useful for blending the ingredients smoothly to achieve a silky texture in your custard base before it goes into the oven or is ready for caramelizing on top.
Digital scale – For precise measurement of ingredients, which offers an advantage for professional-level cooking by ensuring consistent taste and quality across servings.
Microwave-safe bowl – Useful for warming the milk or cream quickly before adding it to the egg mixture, achieving a smoother texture without curdling dairy products.
Straining sieve – Beneficial for removing any lumps from your custard mixture, ensuring a smooth and creamy consistency.
Silicone spatula – Essential for mixing ingredients gently to avoid incorporating too much air or over-mixing the base of your crème brûlée.
Caramelizing torch – The defining equipment for creating the hard caramelized sugar top layer after the dessert is cooked and set.
Rubber or silicone spoon – For gently scraping out of ramekins once cooranfired under a broiler or using a torch for caramelization, ensuring minimal waste.
History of the recipe
The origin of Crème Brûlée dates back to medieval France, where it was initially known as “Cremeschnitte” and served in simple bread dishes. It evolved over time into what we now recognize today – a sophisticated dessert symbolizing French culinary finesse. Throughout history, Crème Brûlée has been adorned by chefs across the world with various twists while maintaining its classic essence of velvety custard and hard caramelized topping, cementing its status as a timeless favorite in dessert cuisines globally.
Fun facts about this recipe
Did you know that the term “Crème Brûlée” literally translates to “burnt cream”? This name stems from the method of caramelizing sugar on top, creating a contrast with the smooth custard beneath. While traditionally made in ramekins and torched for its signature finish, variations exist including individual serving molds that are baked rather than broiled for an even cooking experience. Additionally, despite its French heritage, Crème Brûlée’s adaptation around the world showcases not only a delightful dessert but also how culinary traditions can blend into new cultural landscapes with slight modifications and creative twists that still honor the original flavors.


